Creating an FPS Limiter in Rust by Hooking DirectX
Autor: Jan MetzgerDatum: 12.11.2022
When you are playing games, most of the time you want to experience the full performance that is possible with your setup. However, there might be reasons why you would want to limit the frames per second that a game generates. For example, you can lower the power draw or heat output of your computer by limiting the amount of computation. In this post, we will explore how to limit FPS in DirectX 11 games on Windows using Rust. The general concept can be expanded to any other platform and API like Vulkan, OpenGL etc., but looking at every API would be out of scope for this post.
In the first step, we will explore how we can intercept DirectX 11 games in order to introduce our frame rate limit. After that, we will learn how to inject our code into a game. Lastly, we will implement a way to communicate with the game to set dynamic FPS limits.
How DirectX 11 works
DirectX 11 is an API that is used by many games and engines to render graphics, handle communication with the GPU and much more. Because the DirectX API is public and its runtime libraries are normally provided to the end-user without modification, we can take a deeper look into intercepting the library calls for almost any DirectX 11 powered game. Sadly, DirectX 11 does not provide an easy way to allow external applications to hook into it. But we can make use of the fact that DirectX 11 implementations often work the same way.
In the first stage, the game creates a so called "ID3D11Device" with its context.
D3D11CreateDevice(...);This device represents a virtual video adapter that is used to create resources like textures or vertices.
After the initial setup, a swap chain is set up using the "IDXGISwapChain".
// This is C++ code, we're not at the Rust part yet!
IDXGIFactory* dxgiFactory
HWND window = CreateWindowA(...);
IDXGISwapChain* swapChain;
/// [...]
dxgiFactory->CreateSwapChainForHwnd(device, window, ..., &swapChain);
First, we create a "IDXGIFactory" which will handle the swap chain. Then, we create a window where our final frame buffer will be rendered into. The last step is then creating the swap chain for that window.
But let's go one step back. What actually is a swap chain? In simple terms, it handles the buffer that contains the data our GPU will render. But why can't we just use a normal array for that? Well, it is a bit more complicated than that. Imagine you want to draw a fully black screen. You fill your buffer with the corresponding values and the GPU will display it on your screen. Now, you want to switch from black to red. Every value in the buffer has to be changed to its new value. But what happens if you do that at the exact time the GPU wants to refresh the screen? The screen will now display black and red parts depending on how the buffer has changed yet. To mitigate this tearing, two buffers can be used. The first buffer is the one the GPU reads from and the second is the rebuilding one that can be changed.
This is important, because the consequence is that when a new frame is done, the game has to signal the swap chain that it wants to swap buffers and display it on the user's screen.
// Signals that the new frame is ready to be displayed
swapChain->Present(...)
We now have an entry-point that will always be called when a new frame is being output. Let's hook into it!
Getting to the swap chain's Present function
The goal is to execute our frame rate limiter inside the Present function of the swap chain. In order to do so, we first have to find its address inside the external application. For a second, let's pretend we are not an external program but executing from within. How would we get the address? Simply by doing exactly the same a game does. We do everything necessary to create a swap chain and when the Present function is finally available, we have its address.
First of all, we create a Rust project and set its crate type to "dylib" in order to build it into a .dll file. A library is needed because in order to get the address of Present, we have to inject the library into the game. Second, we need the Windows API to make the DirectX 11 and other calls.
// Cargo.toml
[...]

[dependencies]
winapi = { version = "^0.3", features = ["std", "everything"] }

[lib]
crate-type = ["dylib"]
When we inject our DLL into the game, there has to be a main function that is used to execute code. For this purpose, the DllMain function is being used. It is called with a reason as parameter, one of which is that is has been loaded (attached) in the process.
Let's define our DllMain function in Rust.
use winapi::shared::minwindef::{HINSTANCE, DWORD, LPVOID};
use winapi::um::winnt::DLL_PROCESS_ATTACH;
use winapi::um::libloaderapi::DisableThreadLibraryCalls;
winapi::um::processthreadsapi::CreateThread;

// Tell Rust not to change anything about this function's naming
#[no_mangle]
pub extern "stdcall" fn DllMain(
    hinst_dll: HINSTANCE,
    fdw_reason: DWORD,
    lpv_reserved: LPVOID,
) -> i32 {
    match fdw_reason {
        // The .dll has been loaded
        DLL_PROCESS_ATTACH => {
            unsafe {
                DisableThreadLibraryCalls(hinst_dll);
                // Create a thread that executes our dll_attach function
                CreateThread(
                    std::ptr::null_mut(),
                    0,
                    Some(dll_process_attach_event),
                    hinst_dll as _,
                    0,
                    std::ptr::null_mut(),
                );
            }
            return 1i32;
        }
        // ignore for now
        _ => 1i32,
    }
}

// CreateThread expects an unsafe extern "system" function.
// We will wrap our real attach function so it is not completely unsafe.
unsafe extern "system" fn dll_process_attach_event(base: LPVOID) -> u32 {
    return dll_attach(base);
}

fn dll_attach(_base: LPVOID) -> u32 {
    // todo
    return 0;
}
There is a lot to unpack here, but what is basically being done is when the DLL is loaded, the dll_attach function is being called. Let's use dll_attach to create our swap chain.
First of all, we create an invisible window to pass into the swap chain.
fn dll_attach(_base: LPVOID) -> u32 {
    let window_class_name: CString = CString::new("givemeyourswapchain").unwrap();
    let window_class: WNDCLASSEXA = WNDCLASSEXA {
        cbSize: std::mem::size_of::<WNDCLASSEXA>() as u32,
        style: CS_HREDRAW | CS_VREDRAW,
        lpfnWndProc: Some(DefWindowProcA),
        cbClsExtra: 0,
        cbWndExtra: 0,
        hInstance: unsafe { GetModuleHandleA(std::ptr::null()) },
        hIcon: std::ptr::null_mut(),
        hCursor: std::ptr::null_mut(),
        hbrBackground: std::ptr::null_mut(),
        lpszMenuName: std::ptr::null_mut(),
        lpszClassName: window_class_name.as_ptr(),
        hIconSm: std::ptr::null_mut()
    };
    let registered_window_class = unsafe { RegisterClassExA(&window_class) };
    if registered_window_class == 0 {
        return 1;
    }

    let window = unsafe { CreateWindowExA(
        0,
        window_class_name.as_ptr(),
        window_class_name.as_ptr(),
        WS_OVERLAPPEDWINDOW,
        0,
        0,
        100,
        100,
        std::ptr::null_mut(),
        std::ptr::null_mut(),
        window_class.hInstance,
        std::ptr::null_mut()
    ) };

    if window == std::ptr::null_mut() {
        return 1;
    }
}
Because we use the winapi crate which is not using Option but pointers, we sometimes have to make heavy use of std::ptr::null_mut(). Also, you might have noticed that Windows API calls have to be wrapped into unsafe {} and Strings must be passed using std::ffi::CString. This is because winapi is just calling the underlying C/C++ library of Windows. If you are interested in the parameters passed to create the window, have a look at the Windows API. If there are any failures creating the window, we return 1 to signal that the thread ended with an error, even if it's not important because we are inside another process.
Now, we need to access the DirectX library our current process is using. We can't just link to a new DirectX library because then the Present function would have a different address than the real one. In order to do that, Windows provides us with two functions:
- GetModuleHandleA(lp_module_name): Gives us a handle for the DirectX 11 library of the game
- GetProcAddress(h_module, lp_proc_name): Returns the function in module h_module with name lp_proc_name
fn dll_attach(_base: LPVOID) -> u32 {
    // [...]

    let dx_module_name: CString = CString::new("d3d11.dll").unwrap();
    let lib_d3d11: HMODULE = unsafe { GetModuleHandleA(dx_module_name.as_ptr()) };
    if lib_d3d11 == std::ptr::null_mut() {
        return 1;
    }

    let swapchain_function_name: CString = CString::new("D3D11CreateDeviceAndSwapChain").unwrap();
    let d3d11_create_device_and_swap_chain = unsafe { GetProcAddress(lib_d3d11, swapchain_function_name.as_ptr()) };
    if d3d11_create_device_and_swap_chain == std::ptr::null_mut() {
        return 1;
    }
}
First, we get a handle for d3d11.dll, the DirectX 11 library, and then we retrieve the address for its "D3D11CreateDeviceAndSwapChain" function. Like its name says, this function will create both a device and a swap chain for us. In order to call it, we have to provide some extra information about the swap chain and the device.
fn dll_attach(_base: LPVOID) -> u32 {
    // [...]

    let refresh_rate: DXGI_RATIONAL = DXGI_RATIONAL { Numerator: 60, Denominator: 1 };
    let buffer_desc = DXGI_MODE_DESC {
        Width: 100,
        Height: 100,
        RefreshRate: refresh_rate,
        Format: DXGI_FORMAT_R8G8B8A8_UNORM,
        ScanlineOrdering: DXGI_MODE_SCANLINE_ORDER_UNSPECIFIED,
        Scaling: DXGI_MODE_SCALING_UNSPECIFIED
    };
    let sample_desc = DXGI_SAMPLE_DESC { Count: 1, Quality: 0};
    let swap_chain_desc = DXGI_SWAP_CHAIN_DESC {
        BufferDesc: buffer_desc,
        SampleDesc: sample_desc,
        BufferUsage: DXGI_USAGE_RENDER_TARGET_OUTPUT,
        BufferCount: 1,
        OutputWindow: window,
        Windowed: 1,
        SwapEffect: DXGI_SWAP_EFFECT_DISCARD,
        Flags: DXGI_SWAP_CHAIN_FLAG_ALLOW_MODE_SWITCH
    };

    let mut swap_chain: *mut IDXGISwapChain = unsafe { std::mem::zeroed() };
    let mut device: *mut ID3D11Device = unsafe { std::mem::zeroed() };
    let mut context: *mut ID3D11DeviceContext = unsafe { std::mem::zeroed() };
    let mut d3d_feature_level: D3D_FEATURE_LEVEL = unsafe { std::mem::zeroed() };

    unsafe {
        let result = D3D11CreateDeviceAndSwapChain(
            std::ptr::null_mut(),
            D3D_DRIVER_TYPE_HARDWARE,
            std::ptr::null_mut(),
            0,
            [D3D_FEATURE_LEVEL_10_1, D3D_FEATURE_LEVEL_11_0].as_ptr(),
            2,
            D3D11_SDK_VERSION,
            &swap_chain_desc,
            &mut swap_chain,
            &mut device,
            &mut d3d_feature_level,
            &mut context
        );

        if result < 0 {
            return 1;
        }
    };
}
Again, there is a lot of code for a simple thing. Lets break it down.
- D3D11CreateDeviceAndSwapChain requires us to pass a swap chain description which is used to control how the swap chain is operating. For example, you can see that we set options like the refresh rate. But keep in mind that the exact settings are not that important because we only create this swap chain to get the Present address. After, we can destroy it.
- Due to the nature of the Windows API, we have to pass our swap chain variable as pointer of a pointer. Because Rust wants us to initialize the variable, we do so by setting the pointer to zero, which may be unsafe but in the next call, the variable is being written to in an unsafe way anyways.
- If the result of D3D11CreateDeviceAndSwapChain is less than 0, there was an error e.g. due to wrong parameters.
Let's make sure that swap chain is actually initialized now.
fn dll_attach(_base: LPVOID) -> u32 {
    // [...]

    let swap_chain = unsafe { swap_chain.as_ref() };
    if swap_chain.is_none() {
        return 1;
    }

    let swap_chain = swap_chain.unwrap();
}
Great! We got our swap chain, so how do we get the Present function's address? Thankfully, the Windows API provides us with a pointer:
fn dll_attach(_base: LPVOID) -> u32 {
    // [...]

    let present_function = unsafe { (*swap_chain.lpVtbl).Present };

    unsafe {
        DestroyWindow(window);
        UnregisterClassA(window_class_name.as_ptr(), window_class.hInstance);
    }
}
In "present_function", we have the same Present function used by the game. Perfect! But before we go on, we shouldn't forget cleaning up our window from earlier, because it's not needed anymore. This should also be done before returning 1, but I've omitted it for better readability.
Redirecting the Present function to our own
It's important to understand that we can't just change the pointer of our swap chain's Present member, because that won't change the pointer in the game's swap chain. If we want to redirect the call, we have to change the in-memory code. In other words, the loaded machine code has to be changed in a way that at address "present_function" the program gets redirected to our own function instead. The minhook-sys crate provides bindings for a library doing this exact thing. MinHook will insert a JMP call (if you don't know what a JMP call is, it's redirecting execution to a different place in the code) at the address provided to it and point it to a new function provided by us. It also returns a pointer that can be used to call the original function.
Enough talking, let's get started.
First, the crate has to be added as dependency:
[dependencies]
minhook-sys = "0.1.1"
[...]
Next, we have to create the new Present function we want to call:
unsafe extern "system" fn new_present_function(
   this: *mut IDXGISwapChain,
   sync_interval: UINT,
   flags: UINT) -> HRESULT { ;
    // Todo
}
It might look complicated, but it has to have the same definition as the old Present function, which is why it looks like that.
Now we have to look at MinHook's API. Let's do it directly in the code:
fn dll_attach(_base: LPVOID) -> u32 {
    // [...]

    unsafe {
        // Initialize internal buffers of MinHook
        if MH_Initialize() != MH_OK {
            return 1;
        }

        // Create pointer to hold the original function
        let mut detoured_func: *mut c_void = std::mem::zeroed();

        // Create the hook, redirect present_function to new_present_function
        if MH_CreateHook(
            present_function as *mut c_void,
            new_present_function as *mut c_void,
            &mut detoured_func
        ) != MH_OK {
            return 1;
        }

        // Enable the hook
        if MH_EnableHook(present_function as *mut c_void) != MH_OK {
            return 1;
        }
    }
}
We got it! Now the game will call our "new_present_function" instead of the DirectX one. But there is a problem with that: If the real Present function never gets called, new frames will never be ready to display. That is why the original function's pointer must be stored in some way.
Due to the fact that the parameters of the "new_present_function" can't be changed from its original definition, we will store the original function in a global variable. However, Rust doesn't allow normal static variables to be mutable without having to use unsafe. Even though unsafe is needed at multiple points in the code anyways, let's use a crate called once_cell that allows us to store static mutable variables.
[dependencies]
once_cell = "1.16.0"
[...]
static TRAMPOLINE: OnceCell<unsafe extern "system" fn(
this: *mut IDXGISwapChain,
sync_interval: UINT,
flags: UINT) -> HRESULT> = OnceCell::new();
fn dll_attach(_base: LPVOID) -> u32 {
// [...]
unsafe {
// [...]
// Save trampoline before enabling hook
if TRAMPOLINE.set(std::mem::transmute(detoured_func)).is_err() {
return 1;
}
// Enable the hook
if MH_EnableHook(present_function as *mut c_void) != MH_OK {
return 1;
}
}
}The next step is to return the original function's result in our "new_present_function":
unsafe extern "system" fn new_present_function(
   this: *mut IDXGISwapChain,
   sync_interval: UINT,
   flags: UINT) -> HRESULT {

    let trampoline = TRAMPOLINE.get().unwrap();
    return trampoline(this, sync_interval, flags);
}
If this DLL would be injected as it is, the game would run like it normally would with the difference of an extra function call when its swap chain calls Present.
Limiting the FPS
Now, we have everything we need in order to limit the game's FPS. Let's build a simple FPS limiter logic.
static FRAME_TIME_NS: AtomicU64 = AtomicU64::new(16 * 1000 * 1000);
static TIME_OF_LAST_PRESENT_NS: AtomicU64 = AtomicU64::new(0);

unsafe extern "system" fn new_present_function(
   this: *mut IDXGISwapChain,
   sync_interval: UINT,
   flags: UINT) -> HRESULT {

    let frame_time_ns = FRAME_TIME_NS.load(Ordering::Relaxed);
    if frame_time_ns != 0 {
        let current_time_ns = SystemTime::now()
            .duration_since(SystemTime::UNIX_EPOCH)
            .unwrap()
            .as_nanos() as u64;
        let time_between_last_present_call =
            current_time_ns - TIME_OF_LAST_PRESENT_NS.load(Ordering::Relaxed);
        if time_between_last_present_call < frame_time_ns {
            std::thread::sleep(
                Duration::from_nanos(
                    frame_time_ns - time_between_last_present_call
                )
            );
        }

        TIME_OF_LAST_PRESENT_NS.store(
            SystemTime::now()
                .duration_since(SystemTime::UNIX_EPOCH)
                .unwrap()
                .as_nanos() as u64,
            Ordering::Relaxed
        );
    }

    // [...]
}
First of all, we are storing two variables globally:
- FRAME_TIME_NS: The amount of nanoseconds one frame should be visible. This is basically (1 / FPS * 1000 * 1000 * 1000). We are storing the frame time instead of FPS to save some computation that would have to be done on each time check.
- TIME_OF_LAST_PRESENT_NS: The timestamp of the last Present call. Used to determine the current frame time of the game and check if we need to limit it.
Then, in our Present function, first we check if a frame time has been specified. If so, we compare the current time with the time of the last Present call. If we measure that this difference is smaller than our specified frame time limit, the thread has to be put to sleep for the difference in time.
An example: Take the frame time of 16.67ms (60fps). Our game's previous Present call was at time 1000ms. The next one is at 1009ms. This means that the current frame time is 9ms, which is almost 120fps instead of 60. In order to limit it, we put the game to sleep for (16.67ms - 9ms) = 7.67ms.
Injecting the DLL into a game
In order to run our DLL code in a game, it must be injected into the game's process. For that, let's refactor our Rust project a little bit.
[package]
name = "fpslimiter"
version = "0.1.0"
edition = "2021"

[dependencies]
winapi = { version = "^0.3", features = ["std", "everything"] }
minhook-sys = "0.1.1"
once_cell = "1.16.0"

[[bin]]
name = "fpslimiter_injector"
path = "src/injector/main.rs"

[lib]
name = "fpslimiter_library"
path = "src/library/lib.rs"
crate-type = ["dylib"]
The previous code has to be moved to "src/library/lib.rs" in order to compile. Then, a file "main.rs" must be created in "src/injector/main.rs". We are doing this because we will create a second program, or rather a binary, that will inject our DLL. Instead of creating a second project, it is going to be easier because Rust will output the DLL into the same folder as the binary when building.
Let's check out our main.rs!
// main.rs

fn main() {
    if env::args().nth(1).is_none() {
        println!("Please pass the process name as first argument");
        return;
    }
    let process_name = env::args().nth(1).unwrap();
    inject(&process_name);
}

fn inject(process_name: &str) {
    // Todo
}
We will require that a name of a game's process has to be passed when starting the FPS limiter. In order to inject the DLL, we need a handle to the game's process. Windows provides us with an OpenProcess function to do just that. Because we can't pass a process name to OpenProcess, we need a crate called sysinfo that tells us the PID (Process ID).
[dependencies]
sysinfo = "0.16.4"
[...]
// main.rs
fn inject(process_name: &str) {
let s = sysinfo::System::new_all();
let processes = s.get_process_by_name(process_name);
if processes.is_empty() {
println!("process not found");
return;
}
let process = processes.get(0).unwrap();
let pid = process.pid() as u32;
unsafe {
let process_handle = OpenProcess(
PROCESS_CREATE_THREAD |
PROCESS_QUERY_INFORMATION |
PROCESS_VM_OPERATION |
PROCESS_VM_WRITE |
PROCESS_VM_READ,
0, pid
);
if process_handle.is_null() {
println!("process not found by windows");
return;
}
}
}OpenProcess wants us to pass some access rights. All the enums used can be imported from winapi::um::winnt.
Next, we have to make sure our library gets loaded by the game's process. The plan is:
- Get the address to the LoadLibraryA function. Because this address will be the same for every process, we can get it by getting its address in our own binary. We need the LoadLibraryA function to make the game load our DLL.
- Allocating memory for the DLL path in the game's process by using Windows API's VirtualAllocEx function. VirtualAllocEx allocates memory within the virtual address space of the passed process handle.
- Writing the DLLs path into the allocated memory using WriteProcessMemory.
- Using CreateRemoteThread, we can call the LoadLibraryA function of the game with the address of our DLL's path as parameter.
In code:
// main.rs

fn inject(process_name: &str) {
    // [...]

    unsafe {
        [...]

        let kernel_32_ddl_c_string = CString::new("kernel32.dll").unwrap();
        let load_library_a_c_string = CString::new("LoadLibraryA").unwrap();
        let load_library_a_ptr = GetProcAddress(
            GetModuleHandleA(kernel_32_ddl_c_string.as_ptr()),
            load_library_a_c_string.as_ptr()
        );

        let mut dll_name_path_buf = env::current_exe().unwrap();
        dll_name_path_buf.pop();
        dll_name_path_buf.push("fpslimiter_library.dll");
        let dll_name = dll_name_path_buf.into_os_string().into_string().unwrap();
        let ddl_name_c_string = CString::new(dll_name.clone()).unwrap();

        let virtual_alloc_ptr = VirtualAllocEx(
            process_handle,
            std::ptr::null_mut(),
            dll_name.len() + 1,
            MEM_COMMIT | MEM_RESERVE, PAGE_READWRITE
        );
        WriteProcessMemory(
            process_handle,
            virtual_alloc_ptr,
            ddl_name_c_string.as_ptr() as LPCVOID,
            dll_name.len() + 1,
            std::ptr::null_mut()
        );
        CreateRemoteThread(
            process_handle,
            std::ptr::null_mut(),
            0,
            Some(*(&load_library_a_ptr as *const _
                as *const extern "system" fn(LPVOID) -> u32)
            ),
            virtual_alloc_ptr,
            0,
            std::ptr::null_mut()
        );
    }
}
Testing the program
We are ready to go! Hit the
cargo buildand open your terminal in your target/debug folder.
Now you have to open a game using DirectX 11. Also, if you've compiled the injector using 64 bit, the game has to be 64-bit, too. If you want to limit a 32-bit game, compile the injector using the 32-bit toolchain.
An example of a 64-bit DirectX 11 game is Planet Coaster. In order to inject the DLL, fire up Planet Coaster and from your terminal, run:
fpslimiter_injector.exe PlanetCoaster.exeYour FPS will now be limited to around ~60 due to the frame time set to 16ms.
Make sure to wait a bit after opening Planet Coaster due to its usage of Denuvo Anti-Cheat, which has to decrypt the PlanetCoaster.exe before we can inject our DLL. 3-5 seconds should be more than enough for that. This behavior can only be mitigated if we detect that the game is not ready before injecting, which is out of scope for this post.
We are done with implementing the basic FPS limiter functionality, but let's do one more step and make the FPS configurable.
Connecting the binary and the DLL to send settings
In Windows, there are multiple ways for different processes to communicate with each other. Let's say we want our command line tool to take an FPS limit as stdin input, then we have to be able to send that information to the DLL. One way of doing so is by using Named Pipes. The concept is simple: One party creates a Named Pipe server and the other can then read from it.
For the last part, we will use two more crates. One for reading the FPS limit from stdin and one for the Named Pipes server/client.
[dependencies]
named_pipe = "0.4.1"
text_io = "0.1.12"
Currently, after injection, our program can just exit because it has nothing else to do. Instead of exiting, we will now create a loop that allows us the change the FPS limit whenever we want.
// main.rs
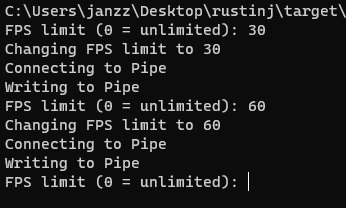
fn main() {
// [...]
loop {
print!("FPS limit (0 = unlimited): ");
// We're on windows, so we have to check for \r\n line ending.
let fps_limit: u16 = read!("{}\r\n");
println!("Changing FPS limit to {}", fps_limit);
write_config(fps_limit);
}
}
fn write_config(fps_limit: u16) {
let pipe_name = r"\\.\pipe\fpslimiter_config";
let mut server = PipeOptions::new(pipe_name).single().unwrap().wait().unwrap();
let config = ["fps_limit", &fps_limit.to_string()].join("=");
server.write(config.as_bytes()).unwrap();
}When a new FPS limit has been entered, we create a Named Pipe at path "\\.\pipe\fpslimiter_config". This path will be used by the client to connect to it. We then send "fps_limit=input" as config.
We will now implement the client in the DLL. The idea is:
- Create a new thread inside the game that reads the config in order not to block the game's code.
- Read the config from the Named Pipe.
- Apply the new limit to our static FRAME_TIME_NS variable.
// lib.rs

// Start with no limit instead of 60 fps
static FRAME_TIME_NS: AtomicU64 = AtomicU64::new(0);

unsafe extern "system" fn read_config_loop(_base: LPVOID) -> u32 {
    loop {
        read_config();
        thread::sleep(Duration::from_secs(1));
    }

    return 0;
}

fn read_config() {
    let pipe_name = r"\\.\pipe\fpslimiter_config";
    let pipe_client = PipeClient::connect(pipe_name);
    if pipe_client.is_err() { return; }

    let mut pipe_client = pipe_client.unwrap();
    let mut read_buffer: [u8; 1024] = [0; 1024];
    let result = pipe_client.read(&mut read_buffer);
    if result.is_err() { return; }

    let config = String::from_utf8(read_buffer[0..result.unwrap()].to_vec());
    if config.is_err() { return; }
    let config = config.unwrap();

    // Probably unneeded safety measure.
    let split_config: Vec<&str> = config.split("=").collect();
    if split_config.len() != 2 || split_config[0] != "fps_limit" { return; }

    let fps_limit = split_config[1].parse::<u64>();
    if fps_limit.is_err() { return; }

    let new_frame_time_ns =
        (1f64 / fps_limit.unwrap() as f64)
        * 1000f64
        * 1000f64
        * 1000f64;
    FRAME_TIME_NS.store(new_frame_time_ns as u64, Ordering::Relaxed);
}

#[no_mangle]
pub extern "stdcall" fn DllMain(...) -> i32 {
    match fdw_reason {
        // The .dll has been loaded
        DLL_PROCESS_ATTACH => {
            unsafe {
                [...]

                CreateThread(
                    std::ptr::null_mut(),
                    0,
                    Some(read_config_loop),
                    hinst_dll as _,
                    0,
                    std::ptr::null_mut(),
                );
            }
            return 1i32;
        }
        // ignore for now
        _ => 1i32,
    }
}
The injector will now enter an endless loop that allows for dynamic FPS limits to be set.
The aftermath
To conclude our journey, here is a little summary of would we have done:
- Created a DLL that can be injected into any process.
- Found the swap chain's Present function which is always called by the game when a new frame is ready.
- Redirected the call of the Present function to our own using MinHook.
- Implemented a simple FPS limiter in our Present function.
- Injected the DLL into a game.
- Allowed the injector and the DLL to communicate FPS limits via a Named Pipe.
Note that while we've only explored DirectX 11, the process to get the Present function is similar for DirectX 9 - 12, just a little bit different every time. You can also check for the used DirectX version by checking if the specific library is present in the process (d3d9.dll, d3d10 etc.). If you want a deeper look at how each API can be intercepted, take a look at kiero which can hook into DirectX 9/10/11/12, OpenGL and Vulkan. The DirectX 11 setup used in this post was also inspired by and translated from kiero.
The complete source code can be found on GitHub: https://github.com/Zazama/Rust-DirectX11-FPS-Limiter-Example.