Reverse Engineering USB RGB Devices and Building Your Own RGB Software by Example
Autor: Jan MetzgerDatum: 01.02.2023
If you are into gaming or similar interests, chances are high that one of your peripherals has RGB support. In today's world, almost every gaming mouse or keyboard shines some light into your dark League of Legends games. Companies normally provide a Tool that you can download and use to change your peripherals RGB lighting. However, there are reasons why you might not like installing those programs. Many of them are not available on Linux and if they are, features can be limited. Even on Windows, many RGB software implementations are made very poorly, with few customizations available. What if I told you that you can build your own software for your peripheral? In this post, we will take a deeper dive into USB protocols, the Glorious Model O's lighting protocol and how you can control it using Rust.
The Glorious Model O and Its Software
Let us start from the beginning by checking out what the Model O officially provides us with. From Glorious' website, we can download a tool to control different settings of the mouse.

At the right in the above image, we can choose what the mouse displays using different lighting options. Next to off, there are eight other options that display different patterns or colors. When looking at the single color effect, the software lets us choose a color and a brightness.

When we change an effect or its settings, the mouse will instantly react and change its settings, too. Somehow, the software must communicate with the mouse and tell it what to do. But this process is not a secret. If we can intercept the USB data, we know how the program is changing the mouse's settings.
Intercepting USB Data Using Wireshark
Wireshark is a tool originally made for network protocol analyzation. When you opened this blog post, your browser sent a network request to this server. Wireshark allows us to see which network requests have been sent and analyze them. But Wireshark is even smarter than that. On installation, it asks you to install a USB packet sniffer called USBPcap. You can think of it like a plugin to Wireshark that allows it to also look into USB traffic instead of only network traffic. When you have installed both correctly, this is what you see after opening Wireshark:
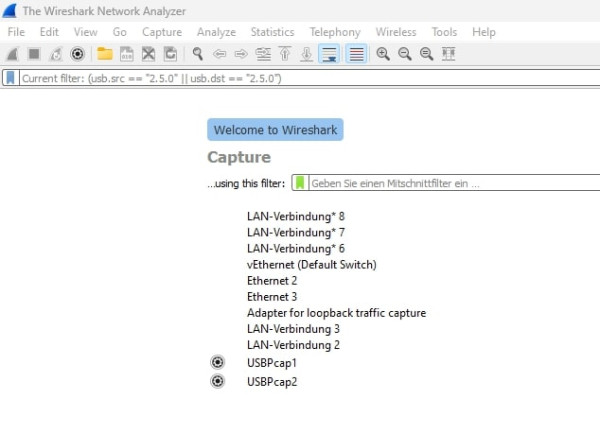
Under capture, it will show you all your network and USB interfaces. Of course, my interfaces and your interfaces will be totally different, but we only have to focus on the USBPcap interfaces at the bottom, forget about the others! In my image, you can see two different USB interfaces, because I have two different USB controllers. The mouse will show up in one of them, however, you may need to check both in order to find it. To start sniffing an interface, double-click it.
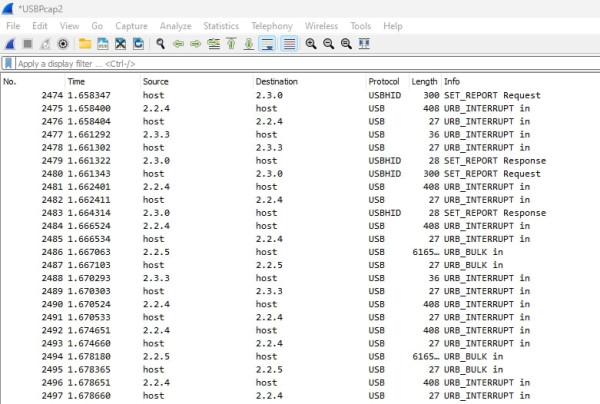
Oh boy! The first thing we can notice is that we get bombarded by USB packages. Think about it: How many times per second does your mouse send data to your PC? In my screenshot, you can see that all USB devices sent almost 2500 packets in under 2 seconds. So, how do we know which packet is from the right device? There are multiple ways to do so:
- Disconnect all USB devices except the peripheral to observe. Then open the official software and change a setting. The packet showing up at that moment will (probably) be to your peripheral.
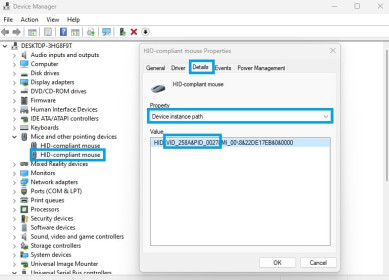
- If that doesn't work, again, disconnect all other USB devices. On Windows, open Device Manager and double-click your peripheral, then go to details and change property to "Device instance path". There, you will see a VID (vendor id) and a PID (product id).
 Now, scroll to the top of your Wireshark packets, you should see multiple calls with "GET DESCRIPTOR Response DEVICE" in the Info column. Check through them until you find a packet where the idVendor and idProduct fields match the VID and PID from the device manager.
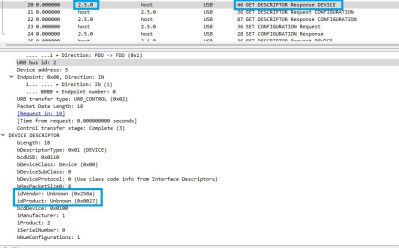
When you found the correct packet, look at the Source/Destination column to identify your device's id in Wireshark.
Let's set a filter in Wireshark so we only see packets send from or to the chosen device:
(usb.src == "2.5.0" || usb.dst == "2.5.0")Change the 2.5.0 to your device id and enter it into the filter text field at the top of Wireshark.
With this in place, let's change a setting in the official software again:

Much better! Let's change a mouse effect in the software. We see that the software sent three packets and got three back in return. Now that we can read what is being sent, we will start analyzing the protocol.
Understanding USB Packets
By clicking on a packet in Wireshark, it will show you a split screen below of the data that has been sent. It provides both a parsed and a raw hex code view. For now, we will focus on the parsed view looking like this:
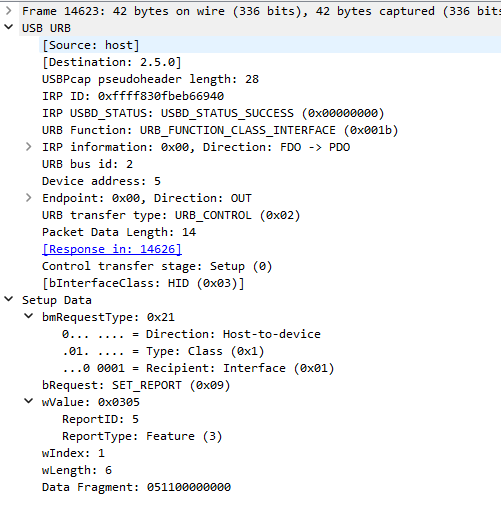
The last entry under USB URB tells us that this is an HID request. HID is a standard that allows device manufactors to configure their devices in a way that any HID driver can understand. Have you ever wondered why you don't have to install a driver when plugging in your mouse? That's because it most likely uses a standard interface! Right now, most important is the Setup Data:
- bmRequestType: The first bit is 0, which means that our computer sent this request to the device. The other direction would be 1.
- bRequest: The Set_Report method is used to control the device, e.g. when you want to send data to it in a synchronous way, like the color it should output. It is not used for things like mouse position.
For the last fields, we need to understand how HID works. When an HID compliant device connects to another, it sends so called HID descriptors. These descriptors tell the HID driver what requests can be handled by the device. We can read the HID descriptor of our Model O by using win-hid-dump on windows or usbhid-dump on Linux. The tools will show the descriptors as HEX code, but we can decode them. For the above request, the corresponding descriptor looks like this:
0x85, 0x05,        //   Report ID (5)
0x15, 0x00,        //   Logical Minimum (0)
0x26, 0xFF, 0x00,  //   Logical Maximum (255)
0x09, 0x00,        //   Usage (0x00)
0x95, 0x05,        //   Report Count (5)
0x75, 0x08,        //   Report Size (8)
0xB1, 0x02,        //   Feature (...)
In line 1, we see that ReportID 5 is currently being specified. The bytes can have a value between 0-255 (line 2-3) and they consist of 8 bits (line 6). Lastly, the data that is sent in this report is 5 bytes long.
Looking back at the Wireshark screenshot above, the Model O software sent a report with ID 5 and the data [0x05, 0x11, 0x00, 0x00, 0x00, 0x00], where the first byte is the ReportID. So what is the 0x11 good for? Well, we don't know yet! We will first have to look at the other packets to understand what is going on.
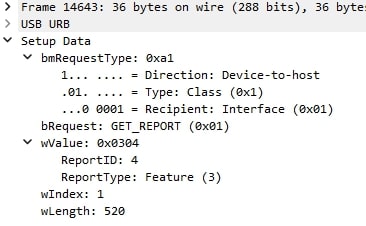
The next packet is a Get_Report request with ReportID 4 and a expected response length of 520 (wLength). This is in line with the HID descriptor of ReportID 4:
0x85, 0x04,        //   Report ID (4)
0x15, 0x00,        //   Logical Minimum (0)
0x26, 0xFF, 0x00,  //   Logical Maximum (255)
0x09, 0x00,        //   Usage (0x00)
0x75, 0x08,        //   Report Size (8)
0x96, 0x07, 0x02,  //   Report Count (519)
0xB1, 0x02,        //   Feature (...)
Notice the report count is 519, but we expect 520 bytes? That's because the data is offset at wIndex 1, because the first byte will be the ReportID 0x04.
By clicking on the "GET_REPORT Response" packet, we can see what the mouse sent us back:
0000   1c 00 40 69 b6 be 0f 83 ff ff 00 00 00 00 08 00
0010   01 02 00 05 00 80 02 83 00 00 00 03 04 11 00 00
0020   00 00 06 00 64 06 04 24 f0 03 07 0d 1f 31 63 00
0030   00 00 00 00 00 00 00 00 00 ff ff 00 00 00 ff ff
0040   00 00 00 ff 00 ff 00 ff ff ff ff 00 00 00 00 00
0050   00 00 41 01 11 ff 38 80 41 07 01 03 02 04 06 05
0060   07 09 08 0a 0c 0b 0d 0f 0e 10 12 11 13 15 14 11
0070   43 00 ff 00 00 00 ff 00 00 00 ff ff ff 00 00 ff
0080   ff ff ff ff fa 00 ff ff 00 00 ff 00 00 ff 00 00
0090   43 01 03 02 04 06 05 02 43 02 ff 00 ff 01 03
This looks very cryptic. The returned packet data is 131 bytes long and we don't know what it contains, yet. However, when we look at the next packet, we can tell what is going on. The third and last packet is a Set_Report that sends 520 bytes to the mouse. Let's compare it with the data from the Get_Report packet. The first one is the Get_Report and the second one is the Set_Report packet:
The blue box contains the real data. We can see by comparing both hex dumps that it is almost the same data in both requests, only three bytes have changed. They are marked in the Set_Report packet.
This tells us two things:
- The Get_Report packet probably retrieves the current settings from the mouse, then the software makes its changes and sends the new settings back.
- By switching between settings, we can identify changes in the report data. This allows us to re-create the protocol setting by setting.
While we still don't know what the first Set_Report packet is about, it doesn't matter for now. As long as we make the same calls as the official software, everything should work (spoiler: It's selecting which settings you want to retrieve, which is why it has to be sent before Get_Report).
Deciphering the Glorious Model O's Effect protocol
In order to understand the protocol, we have to make systematic changes. In the official software, there are 9 different effect settings that you can choose from. First, we choose the "LED OFF" mode. Then, we change it to "Single Color". This effect gives us two options: Brightness and Color. In the following image, we can see the difference between "LED OFF", Single Color with Brightness 25% (lowest) and Single Color with Brightness 100% (highest):
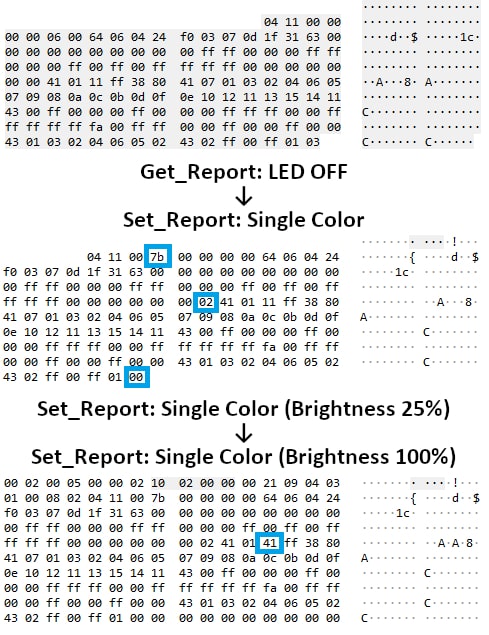
When we change from "LED OFF" to "Single Color", we see three bytes have changed. Including the Brightness, there are 4 byte changes withing these settings.
| Byte[x] |
From | To | Reason |
| 3 | 0x00 | 0x7b | |
| 53 | 0x00 | 0x02 | |
| 56 | 0x11 | 0x41 | Brightness |
| 130 | 0x03 | 0x00 |
We can only tell that Byte[56] controls the brightness. By changing the 4-step brightness slider in the software further, it shows that:
| Brightness | Byte | Value |
| 25% | 56 | 0x11 |
| 50% | 56 | 0x21 |
| 75% | 56 | 0x31 |
| 100% | 56 | 0x41 |
To reach a conclusion about the other bytes, let's make some different settings:
- By comparing every Get_Report with Set_Report, we can tell that Byte[3] is 0x7b when writing settings, it's only 0x00 when retrieving them.
- By selecting different effects, we can tell that
- Byte[53] is the effect mode (OFF = 0x00, Single color = 0x02, etc.)
- Byte[130] is specific to the OFF mode, it's only 0x03 when the LEDs are off, otherwise it's 0x00
By changing the color in the software, we can finalize our Single Color protocol. Changing the color to RGB(1,2,3) results in the following byte changes:
| Byte[x] | Value | Color |
| 57 | 0x01 | Red |
| 58 | 0x03 | Blue |
| 59 | 0x02 | Green |
I don't know why the colors are RBG instead of RGB in the protocol, but we'll have to take it as it is.
What we have learned so far:
IF RECEIVING DATA:
    Byte[3] = 0x00
ELSE:
    Byte[3] = 0x7b


IF LED OFF:
    Byte[130] = 0x03
    Byte[53]  = 0x00
ELSE
    Byte[130] = 0x00


IF SINGLE COLOR:
    Byte[53] = 0x02
    // Brightness
    Byte[56] = 0x11 OR 0x21 OR 0x31 OR 0x41
    Byte[57] = RedColor
    Byte[58] = BlueColor
    Byte[59] = GreenColor
Great start, however, there are 7 more effect modes to be examined! I will spare you the details in this blog post, you can find them in the full repository. The principle is mostly the same, change a setting, check the change and evaluate the meaning.
Creating a Glorious Library in Rust
Now that we understand what is going on, there is only one thing left: Writing the code. In order to communicate with the USB device, we will be using the hidapi crate, which is a wrapper around the hidapi C library. In simpler words: It gives us the tooling required to connect to the device and send Get_Report and Set_Report requests. Of course, you can do this in any other language, it will work the same way, just with different syntax.
Using Rust, create a new folder and open your terminal. We'll create a new library project using:
cargo init --libNow, add the hidapi crate to your project (add only works if you have cargo/rust version 1.62 or higher, you can update using "rustup update"):
cargo add hidapiNext, open the src/lib.rs file, delete the default code in there and let's start editing it. For simplicity, I will not talk about splitting the lib.rs into multiple files, but I recommend doing so if you're trying to create a project like this.
First of all, we will define some constants. Do you remember the product id and vendor id of your mouse from earlier? We will use it to identify the mouse using hidapi.
extern crate hidapi;
use hidapi::{HidApi, HidDevice, HidError};

const VENDOR_ID: u16 = 0x258A;
const PRODUCT_ID: u16 = 0x27;
If you have the wireless version or the Model O-/D/D-, you will have to change the vendor/product id depending on your values.
Because we are trying to create a library, users should be able to instantiate it. Let's create a struct for it and make it public. If you have no idea about Rust, you could view this struct as e.g. a class in Python.
pub struct GloriousDevice {
    data_device: HidDevice,
    control_device: HidDevice
}
We define two fields, data and control device. They are both of type HidDevice, which is an opened device in hidapi. Why do we need two devices? Because Windows splits the Model O into multiple HID devices. There will be one device that we can send ReportID 4 (our settings data) to and one which supports ReportID 5 (controlling which data is being accessed). Now we will implement a way to create a GloriousDevice instance:
impl GloriousDevice {
    pub fn new() -> Result<Self, HidError> {
        let api = HidApi::new()?;

        // Get all model o device infos
        let devices = Self::filter_model_o_devices(&api);
        let data_device = Self::find_data_device(&api, &devices);
        let control_device = Self::find_control_device(&api, &devices);

        if data_device.is_some() && control_device.is_some() {
            return Ok(GloriousDevice {
                data_device: data_device.unwrap(),
                control_device: control_device.unwrap()
            });
        }

        return Err(HidError::HidApiError { message: "Device not found".to_owned() });
    }
}
There are three private functions in here so the code is more readable. First, we get all Model O devices filtered by the product and vendor id that we have specified:
fn filter_model_o_devices(api: &HidApi) -> Vec<&DeviceInfo> {
    return api
        .device_list()
        .filter(|info|
            info.vendor_id() == VENDOR_ID &&
            info.product_id() == PRODUCT_ID
        )
        .collect();
}
The hidapi library has a function device_list() that gets us all available USB devices as DeviceInfo struct. We can use this info struct to identify the device using the vendor_id() and product_id() methods. We have not connected to any device yet.
Next, we want to get the device that allows us to send Report ID 4 feature requests:
fn find_data_device(
    api: &HidApi,
    devices: &Vec<&DeviceInfo>
) -> Option<HidDevice> {
    return devices
        .iter()
        // Only check devices that can actually be opened
        .filter_map(|info| info.open_device(&api).ok())
        .filter(|device| {
            // We will create a ReportID 4 buffer to test if it gets sent
            // by the HID driver. If it fails, we got the wrong device.
            let mut buffer: [u8; 520] = [0x00; 520];
            buffer[0] = 0x04;
            return device
                .send_feature_report(&mut buffer)
                .is_ok();
        }).next();
}
This might look a little complicated, but it's easy when broken down. The method receives a list of device infos that we have filtered earlier. First, we filter this iterator to only yield devices that we can actually open using filter_map. Then, we filter opened devices to only those of them that can receive a Report ID 4 feature request without failing. Using next(), we get the first device that is able to do all that.
The find_control_device is the same, only the buffer that gets send is a little different:
let mut buffer: [u8; 6] = [0x05, 0x00, 0x00, 0x00, 0x00, 0x00];
return device
    .send_feature_report(&mut buffer)
    .is_ok();
Let's create a test to see if we can find a GloriousDevice! At the end of the lib.rs file, we can append a test configuration:
#[cfg(test)]
mod tests {
    use crate::{GloriousDevice};

    #[test]
    fn connect() {
        GloriousDevice::new().unwrap();
    }
}
Now run "cargo test". The output should look like this:
running 1 test
test tests::connect ... ok

test result: ok. 1 passed; 0 failed; 0 ignored; 0 measured; 0 filtered out; finished in 0.17s
If you have no Model O or you disconnect it, the test will fail.
Next, we will parse the settings that we already know about. We'll create an enum that determines which type of effect is being used and we will pass the different options that each effect has:
#[derive(Copy, Clone)]
pub enum LightingEffect {
    Unknown,
    Off,
    SingleColor { color: RGBColor, brightness: EffectBrightness }
}

impl LightingEffect {
    fn from_buffer(buffer: &[u8]) -> Self {
        if buffer.len() < 131 {
            return Self::Unknown;
        }

        // We remember, Byte[53] is the effect mode.
        return match buffer[53] {
            0x00 => LightingEffect::Off,
            0x02 => LightingEffect::SingleColor {
                color: RGBColor::from_rbg_buffer(&buffer[57..60]),
                brightness: EffectBrightness::from_u8(buffer[56])
            },
            _ => LightingEffect::Unknown
        }
    }
}
Remember that the Single Color mode has a color and a brightness setting? Spoiler: It's not the only mode with those settings. Instead of saving the bytes into the enum, let's instead create a struct RGBColor and an enum EffectBrightness. RGBColor is a struct because it only holds the data, EffectBrightness is an enum because there are only four brightness settings, 25%, 50%, 75% and 100%.
// Set representation to u8 to easily
// convert the value back from "enum" to u8
#[repr(u8)]
#[derive(Copy, Clone)]
pub enum EffectBrightness {
    Low = 0x10,
    Medium = 0x20,
    High = 0x30,
    Highest = 0x40
}

#[derive(Copy, Clone)]
pub struct RGBColor {
    pub red: u8,
    pub green: u8,
    pub blue: u8
}
If you remember how the brightness is represented, it was always 0x11, 0x21, 0x31 or 0x41. What you don't know yet is that the first bit, the one, does not matter for brightness because it is the effect speed. Because Single Color has no effect speed option, we didn't explore it yet. For brightness, only bit 5-7 is important. We can mask it using 0x70. If you don't know what a bit mask is, it can be used to force certain bits to be 0. E.g. using "byte & 0x70" will only allow the bits that are 1 in 0x70 to be 1 in the byte.
| Bit[x] | 7 | 6 | 5 | 4 | 3 | 2 | 1 | 0 |
| Data | 0 | 0 | 0 | 1 | 0 | 0 | 0 | 1 |
| 0x70 Mask | 0 | 1 | 1 | 1 | 0 | 0 | 0 | 0 |
| Data & Mask | 0 | 0 | 0 | 1 | 0 | 0 | 0 | 0 |
impl EffectBrightness {
    pub fn from_u8(value: u8) -> Self {
        return match value & 0x70 {
            0x10 => Self::Low,
            0x20 => Self::Medium,
            0x30 => Self::High,
            0x40 => Self::Highest,
            _ => Self::Highest
        }
    }
}
This allows us to call EffectBrightness::from_u8 to easily create the enum and let it parse by itself. Let's do the same for RGBColor:
impl RGBColor {
    pub fn from_rbg_buffer(buffer: &[u8]) -> Self {
        return Self {
            red: *buffer.get(0).unwrap_or(&0),
            green: *buffer.get(2).unwrap_or(&0),
            blue: *buffer.get(1).unwrap_or(&0)
        };
    }
}
Remember that RGB is represented as RBG in the protocol, so we have to convert it.
Before we get the data from the mouse and parse it, we will have to create one more helper. Do you remember that the original software first fetches the current mouse settings and then makes the changes? We have to do the same thing, because when changing one mouse setting, it shouldn't change other ones to a default one. So we will need a state around the current settings. Let's create one by the name "FeatureReport":
pub struct FeatureReport {
    raw_data: Vec<u8>,
    lighting_effect: LightingEffect,
}

impl FeatureReport {
    pub fn from_buffer(buffer: &[u8]) -> Option<Self> {
        if buffer.len() < 131 {
            return None;
        }

        return Some(Self {
            raw_data: Vec::from(buffer),
            lighting_effect: LightingEffect::from_buffer(&buffer)
        });
    }

    pub fn lighting_effect(&self) -> LightingEffect {
        return self.lighting_effect.clone();
    }
}
FeatureReport will store the raw buffer but also the parsed settings. Because we want to change the buffer whenever a setting changes, we don't allow external access to lighting_effect but only allow getting it as a clone.
We can now implement getting the settings in GloriousDevice's impl:
impl GloriousDevice {
    // ...

    fn prepare_settings_request(&self) -> Result<(), HidError> {
        let mut req = [0x05, 0x11, 0, 0, 0, 0];
        self.control_device.send_feature_report(&mut req)?;
        return Ok(());
    }

    pub fn get_settings(&self) -> Result<FeatureReport, HidError> {
        self.prepare_settings_request()?;
        let mut buffer: [u8; 520] = [0x00; 520];
        buffer[0] = 0x04;
        self.data_device.get_feature_report(&mut buffer)?;

        return Ok(
            FeatureReport::from_buffer(&buffer)
                .ok_or(HidError::HidApiError {
                    message: "Bad data".to_owned()
                })?
        );
    }
}
The first function "prepare_settings_request" sends a Set_Report request with ReportID 5 and data 0x11 to the mouse, telling it to return its settings next. In get_settings, we do a Get_Report request and pass a 520 byte buffer that hidapi will return filled with the settings data.
This should work. Because we can't send settings to the mouse yet, go into Glorious' software and change the effect to Single Color with color rgb(1, 2, 3) and brightness 25%. We can now try a simple test:
#[cfg(test)]
mod tests {
    // ...

    #[test]
    fn lighting_effect() {
        let device = GloriousDevice::new().unwrap();
        let settings = device.get_settings().unwrap();

        match settings.lighting_effect() {
            LightingEffect::SingleColor { color, brightness } => {
                assert!(color.red == 1);
                assert!(color.green == 2);
                assert!(color.blue == 3);
                assert!(matches!(brightness, EffectBrightness::Low));
            },
            _ => assert!(false)
        };
    }
}
First, we get a new device, then we do a ReportID 5 request and then we get the settings. Using assert, we can test if the colors and brightness match. In order to execute this test successfully, use "cargo test -- --test-threads=1" because hidapi will throw if it is instantiated twice.
running 2 tests
test tests::connect ... ok
test tests::lighting_effect ... ok

test result: ok. 2 passed; 0 failed; 0 ignored; 0 measured; 0 filtered out; finished in 0.35s
Looking good!
To wrap everything up, we will implement changing settings. Right now, we only care about the lighting effect, so we will create a new method in FeatureReport called "set_lighting_effect". This method changes the lighting effect enum but also makes the changes in the buffer. Also, we need access to the FeatureReport's buffer in order to send it back to the mouse:
impl FeatureReport {
    // ...

    pub fn set_lighting_effect(&mut self, effect: LightingEffect) {
        effect.set_in_buffer(&mut self.raw_data);
        self.lighting_effect = effect;
    }

    pub fn to_buffer(&self) -> [u8; 520] {
        let mut data = self.raw_data.clone();
        data.resize(520, 0x00);

        return data.try_into().unwrap();
    }
}
We'll also implement the set_in_buffer method in the LightingEffect enum:
impl LightingEffect {
    //...

    fn set_in_buffer(&self, buffer: &mut [u8]) -> bool {
        if buffer.len() < 131 {
            return false;
        }

        match self {
            LightingEffect::Off | LightingEffect::Unknown => {
                buffer[53] = 0x00;
            },
            LightingEffect::SingleColor { color, brightness } => {
                buffer[53] = 0x02;
                buffer[56] = *brightness as u8;
                buffer[57..60].copy_from_slice(&color.to_rbg_buffer());
            }
        }

        if matches!(self, LightingEffect::Off) {
            buffer[130] = 0x03;
        } else {
            buffer[130] = 0x00;
        }

        return true;
    }
}
And also, we implement a way to convert an RGBColor back to a RBG buffer:
impl RGBColor {
    //...

    fn to_rbg_buffer(&self) -> [u8; 3] {
        return [self.red, self.blue, self.green];
    }
}
Now that everything is set up inside the FeatureReport, we can create the necessary methods in the library:
impl GloriousDevice {
    // ...

    pub fn commit_settings(
        &self, report: &FeatureReport
    ) -> Result<(), HidError> {
        let mut report_buffer = Vec::from(report.to_buffer());
        // When sending the settings, Byte[3] is always 0x7B!
        report_buffer[3] = 0x7B;
        self.data_device.send_feature_report(&report_buffer)?;
        return Ok(());
    }
}
Perfect! Let's adjust our lighting_effect test and try it out!
#[cfg(test)]
mod tests {
    // ...

    #[test]
    fn lighting_effect() {
        let device = GloriousDevice::new().unwrap();
        // Test Get_Report ID 4 working
        let mut settings = device.get_settings().unwrap();

        let new_lighting_effect = LightingEffect::SingleColor {
            color: RGBColor::from_rbg_buffer(&[0x22, 0x24, 0x23]),
            brightness: EffectBrightness::High
        };

        settings.set_lighting_effect(new_lighting_effect);
        // Test Set_Report ID 4 working
        device.commit_settings(&settings).unwrap();

        match device.get_settings().unwrap().lighting_effect() {
            LightingEffect::SingleColor { color, brightness } => {
                assert!(color.red == 0x22);
                assert!(color.green == 0x23);
                assert!(color.blue == 0x24);
                assert!(matches!(brightness, EffectBrightness::High));
            },
            _ => assert!(false)
        };
    }
}
Now, we don't have to set the colors in Glorious' software anymore but can change them directly in the library. This means we can test everything from within. Running "cargo test -- --test-threads=1" again yields:
running 2 tests
test tests::connect ... ok
test tests::lighting_effect ... ok

test result: ok. 2 passed; 0 failed; 0 ignored; 0 measured; 0 filtered out; finished in 0.36s
We have successfully implemented getting and setting the lighting effect on the Model O!
Get the full lib.rs from the gist here.
Summary
To conclude our journey, here is a little summary of would we have done:
- Set up Wireshark to sniff into USB packets
- Found the Model O and its vendor/product id
- Checked the HID descriptor for the data it expects
- Reverse Engineered parts of the lighting protocol by fiddling with the options in the official software
- Implemented what we found out into a Rust library that can now control the Model O
While not every feature is implemented yet, the rest can be done in the same way as the features that we have implemented in this post.